Monday, 28 August 2017

Making a Roll-up Picnic Blanket from an old Quilt Cover

If you look back through my blog I am sure that you would soon realise that I like to reuse and recycle and never like to waste fabric. This holiday picnic rug was made from a child's single quilt cover with some extra fabric from my stash for the patchwork.


I was given a 101 Dalmatians quilt set. It didn't co-ordinate with my son's bedroom but it was so nice that I wanted to find a use for it. The top of the quilt cover had a large picture of the Disney Dalmatian characters while the underside was white and covered with puppy motifs.


To make my picnic blanket I kept the large design in-tact to use it for the back of the quilt. Then I cut out 15 large squares from three contrasting cotton fabrics. This quilt is not my own design. It was designed by Vick Guthrie and I found the pattern in Sewing World, June 2014. I am so glad that I keep these old magazines. I have searched on line to see if I can find the instructions but I think 2014 may just be too long ago. Please leave a comment for me if you can find them.


The pillowcase had a picture of two sleeping puppies which was so cute. I cut one square from the pillowcase to use in the bottom corner of the patchwork and I do like this feature.


Once the patchwork squares were joined I edged them with strips of dark blue fabric and then puppy fabric until the patchwork side was roughly the same size as the single quilt.

With right sides together, I joined the back and front of my quilt, clipped the corners and turned it right sides out. I came across a bit of a problem here because I had been tearing my cotton fabric along the straight grain rather than using scissors. The quilt cover hadn't been made on the straight grain originally and I didn't anticipate this. After bit of remedial work I did manage to salvage a big enough piece to back the whole quilt but it is a little bit twisted in places.
This would have been the time to add wadding to make the quilt thicker and softer and perhaps to have made a bed quilt but I wanted a beach mat so I did not add any wadding between the cotton layers. As a result it very easy to dry the picnic rug if it gets damp.


At the open end of the quilt I added a flap with ribbon ties and a handle so that the rug can be rolled up and carried easily. Then I closed up the seam with a single row of top stitching. Again I used the instructions from the pattern by Vick Guthrie.

I have quilted the two layers together in a square pattern which holds everything in place nicely. The whole quilt folds into 4 and rolls up neatly for carrying.


I was very pleased with this redesign of an unused quilt cover. It keeps the sand off of children's hands during picnics on the beach. If we need to sit on damp grass we put a tarpaulin down underneath. However, you can trust your family to bring you back down to earth and stop you from getting too big headed can't you? My sons refer to this picnic rug as "The Dog Blanket". It doesn't sound very attractive does it?


Saturday, 26 August 2017

Eureka, I found it - The Perfect Sleeveless Shell Top!

Well, I have been away from writing posts for a while on holiday but now the holidays are over and I have a quite a collection of things that I would like to put on my blog.

I made a sleeveless top in July and wanted to make two more to take away on holiday, so I was looking for the perfect pattern. The one I made here was nice but I was annoyed every time I wore it by the neck and the armhole facings. I caught them down at the seams but they still kept poking out and gave the top an untidy feel. While I was searching though my pattern collection and reading other people's blogs I came across a post on Handmade Jane here. She had also been looking for the perfect summer top and was recommending the Sleeveless Shell Top in GBSB book, Fashion with Fabric and.... I have this book!!

Jane's version covered with red roses was beautiful, inspiring, and what was more, she posted it on my birthday! It was obviously meant for me.

I decided to start with a wearable toile because my holiday was coming up and time was short as always. I had a small remnant of pink floral cotton in my stash with a flaw in the printing. I traced the pattern and after a bit of careful manoeuvring I managed to fit all of the pattern pieces on to the fabric. The facing had to be cut from the piece with the flaw in it but since it would be inside the blouse no-one will know unless they read this blog.


I made the blouse in a straight size 12 which is my usual RTW size. Like all GBSB patterns the instructions are very good with clear pictures and written instructions. Lots of basic sewing skills are included in the first part of the book in cased you have never sewed before or need a reminder. The pattern is rated beginner plus. All of the pieces came together easily and I would describe it as a really satisfying pattern to make. The way that the facing is sewn in is very clever. Leaving the centre back seam open, both sides turn out through the shoulders. There are no fiddly bits that need hand sewing and the finish around the neck and armholes is so neat. I chose a fine, iron on interfacing which added just a bit of body and I am very pleased with the all in one facing. It is exactly what I was looking for. I hope these pictures will show just how well the blouse is designed and how nicely all of the pieces fitted together.


Another feature of this blouse that I really like is the shaped centre back seam that adds a bit of extra shape at the waist. The top pulls on easily over my head without needing to undo the button but I like the button and loop detail so have decided to keep this in my second version.


I also really like the up/down hemline. Most of my short summer tops ride up in wrinkles at the front and soon look as though they need an iron. The raised front on this top comes up high enough that it does not wrinkle when I sit down. I wore my blouses for whole days of sight seeing in Paris and they were still fresh looking when I struggled, weary but happy, back to the camp site in the evening.

The pink flowered cotton was a small, bargain remnant that I didn't really like all that much when I bought it. It just seemed too good a bargain to leave behind. I am very pleased to say that now I have made this top I love the fabric. It has turned out so much better than I expected.

This blouse made its debut on a visit to Eurodisney on the first day of our holiday.


After making a successful toile that I will wear again and again I was ready to use the fabric I bought especially to make a new summer top. The moped design seemed very suitable for a holiday in France. The second shell top has turned out as well as the first and has had just as much wear while I have been away. I had 1.5 metres of this fabric so cutting out was easy this time. The fit seemed good without any alterations so I made the size 12 again.


I like the way that the mopeds line up across the blouse and then run in diagonal lines from corner to corner. It feels really summery. I was pleased to have matched up the lines across the back but with a curved seam it wasn't possible to match up the mopeds exactly and in the end I didn't have quite enough fabric to attempt this.


This top climbed the Eiffel tower the long way, up the stairs! The photo was taken on the way down when I wasn't so out of breath.


I would highly recommend this pattern and will definitely make more of these simple tops. I am tempted to try the pattern hack with buttons all the way down the back and have a piece of broidery englaise waiting but there are several other projects in the queue before I start that.


We had a really amazing holiday and now that I am home I am bursting with ideas for new projects. That is always the danger when I have some time away from home to relax! Does anyone else find that?

Wednesday, 16 August 2017

Seaside Roller Blind and Philip the Seagull

Now that the weather is warmer and the schools have broken up for the summer we are using our new caravan to get away. The new caravan is great but lacks the personal touch that the old one had after many years of family holidays. This presents the perfect opportunity, however, for me to sew something.

I have already made a small pair of curtains to cover a cupboard opening here. My next project has been a blind to brighten up the shower room. The original blind was made from a grey, satin fabric which, although it was functional, wasn't very attractive to look at. I save most of my sewing magazines and found instructions for a roll-up blind in the October 2015 issue of Sew, Style & Home.


This is a very simple pattern which rolls up and is held in place with two ribbons. I wanted a seaside theme for the shower room and had two pieces of contrasting fabric left over from previous projects. I measured the window and cut a rectangle from each of the contrasting fabrics adding 1.5cm seam allowance on each side and 6.5 cm to the drop. Then I stitched the rectangles right sides together along the sides and bottom edge, trimmed the corners and turned the blind right sides out. My striped fabric is quite firm so I didn't need any interfacing to stiffen my blind but I would have added this layer if I had used two soft cotton fabrics. 

The original blind was held in place above the window with Velcro. I saved this before I threw the old blind away. I folded over a 5cm hem at the top edge, positioned long grossgrain ribbons to hang down the same length at the front and back and then sewed the Velcro strip to the top of the blind sewing over the top of the ribbons to hold them in place. 


The blind drops down when you untie the ribbons.


Being a small blind it is easy to roll up again. It gives the shower room a real holiday feel. 

Just for a bit of fun I knitted a woolly seagull. On holiday in St Davids one year my middle son, who was about 7 at the time, was mesmerised watching the seagulls wheeling overhead. This started a fascination with sea birds for him. He picked out a favourite on that day and named him "Philip". At each summer holiday he would look out for "Philip" and this remarkable bird followed us around the coast, always turning up at the beach we were visiting. Sometimes Philip was a Herring Gull, on other occasions he was a Kittiwake or a Black-Backed Gull, but he was always there for us. When my son was 11 he had to imagine he was an animal for an English essay and he was Philip the Albatross circling the globe, riding the thermals. Now I have my own little "Philip the Seagull" to bring back these happy memories.


I doubt that we will ever use the shower in the caravan for its intended purpose, but it is a very useful storage space and somewhere to get dressed in comfort. I like a site with a purpose-built toilet and shower block, with central heating if possible! The effort of carrying all of the water for a shower to the caravan and taking all of the waste water away afterwards removes the pleasure from a long, hot shower. But the shower room is now much brighter, more cheerful and a very useful space. 


Happy holidays....

Monday, 31 July 2017

Kwik sew 6391 again, a summer top

With all the hot weather we have been having, in between the rain showers, I have noticed the lack of summer tops in my wardrobe and thought I should do something to rectify this. I had just one metre of this beautiful floaty fabric. It was the end of the roll and only the first metre of the fabric was printed the rest was plain. I couldn't resist buying it and hoping that it would be enough to make something nice


This design is so interesting. It was a pleasure to sew because I kept seeing new things in the pattern. At first I was drawn to the button boots and roses but as I looked more closely I saw jewellery, lace, butterflies, a fan and so much more.

I needed a pattern for a sleeveless top which would not take too much fabric and I chose Kwik Sew 6391. I had used this pattern before to make a winter tunic dress in a much thicker knit fabric but the pattern is designed for light weight woven fabrics like this one. View B can be made from just one metre of fabric and I had just enough.

This fabric has a lovely drape but does not stretch at all. It was easy to sew because it didn't slide or slip. I am pleased with the finished top which is very cool to wear. 


The pleats sit nicely at the neck and it doesn't gape at the back.


I chose the medium size again. This blouse is quite roomy but because the fabric is so soft and drapes well this isn't a problem (I had to take the tunic in quite a lot because it was too big).

Although I am very pleased with both of the garments I made using this pattern there is one thing I don't like about it. The neck and armholes are finished with separate facings, which have a real tendency to poke out. I much prefer an all in one facing or bias binding and I will alter the pattern if I use it again. Here you can see the inside. I top-stitched all of the facings but they just don't want to lie flat. I have also neatened all of the raw edges with a narrow zig-zag to stop them fraying. 


All in all this is a nice blouse which is going to get plenty of wear if the weather stays nice.


For my next project I am looking for a sleeveless blouse to make in a cotton fabric with an all-in-one facing. Watch this space...

Bye for now, Rosemary.

Sunday, 16 July 2017

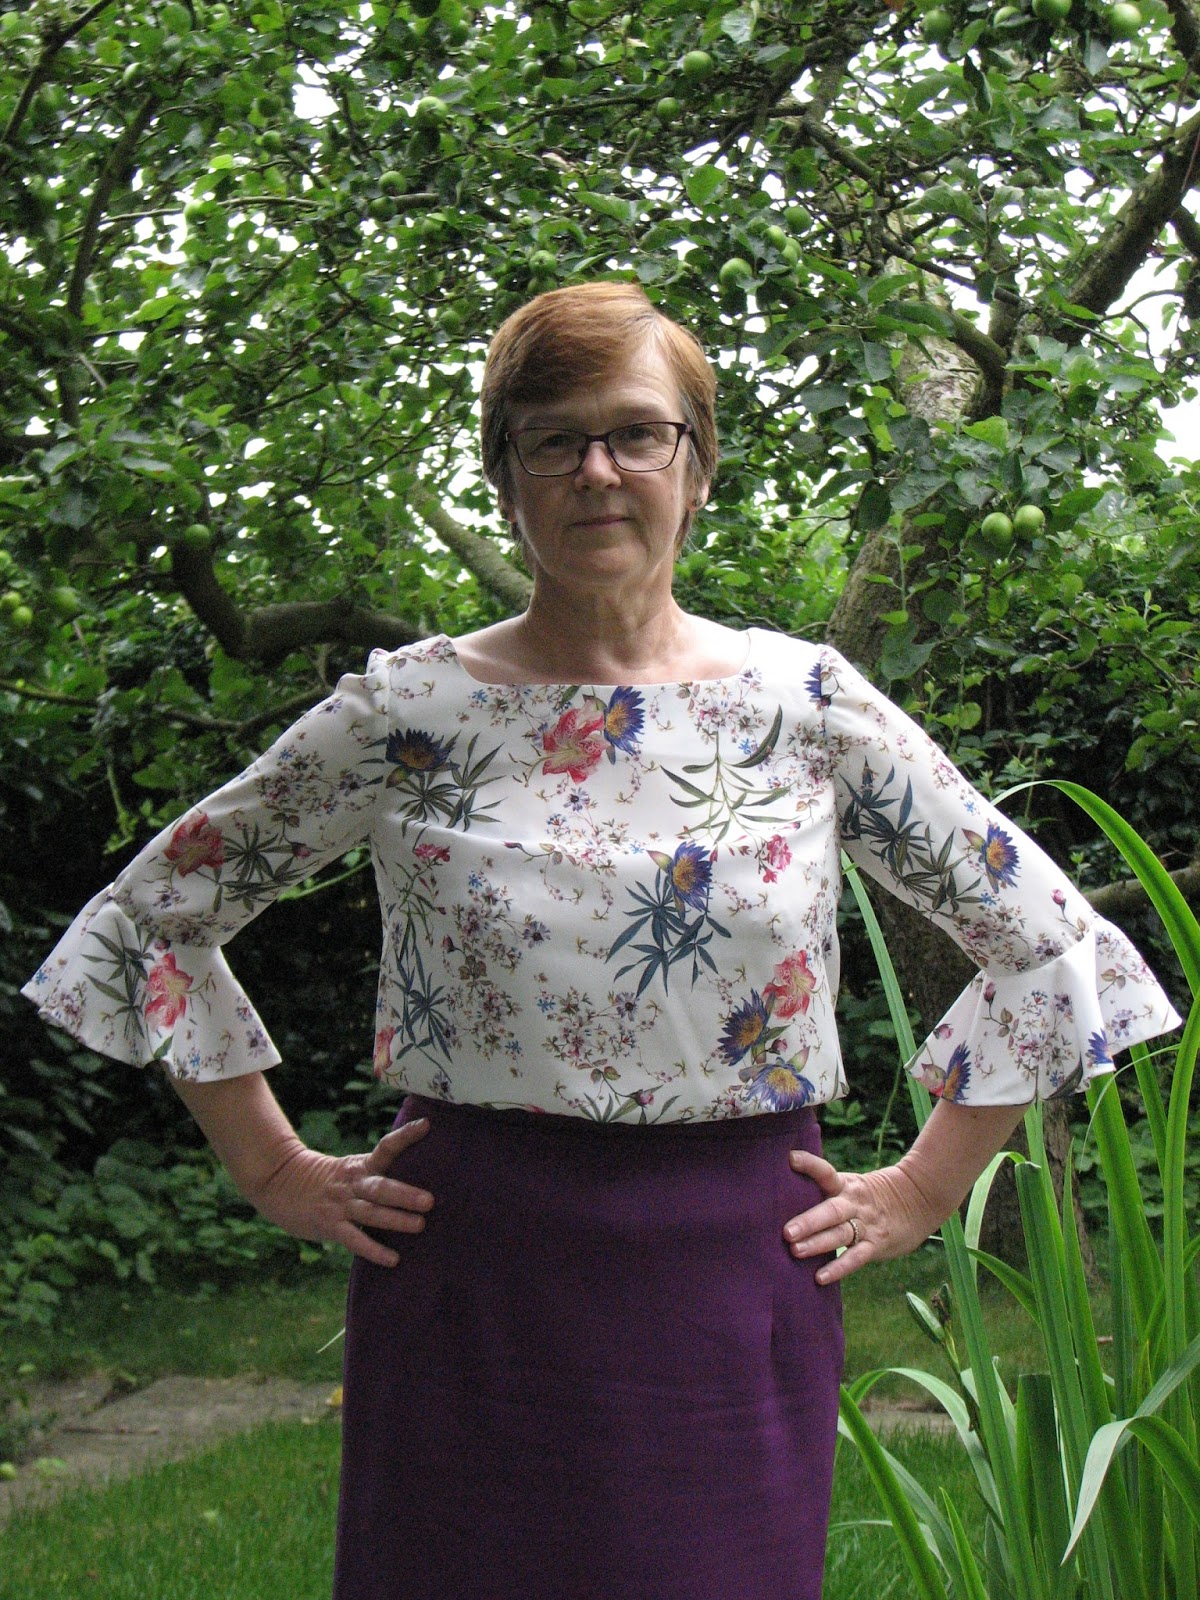
Flutter Sleeve Blouse from a Vintage Pattern

At the end of May I cut out three new projects ready to sew, which is unusual for me because I normally limit myself to one thing at a time. I completed the first one here but life gets busy. OFSTED turned up at work, and some of you will have an understanding of what this means for any free time that you might have planned. 

Anyway, I have been looking at blouses with gathered cuffs for some time and wanted to make one for myself. I had a vintage pattern with just the sleeve I was looking for and the fabric to make it in my stash. I just needed to bring them both together. I loved this fabric as soon as I saw it. It is covered in passion flowers and lilies. I bought 2 one-yard pieces from the remnant stall on Leicester market.


I haven't been disappointed. The blouse is so pretty and makes me feel very feminine. The sleeves are comfortable to wear. They are short enough for the ruffles not to get in the way when you have a busy lifestyle.

I used a vintage pattern that I have made before here and this time I chose view D.


I didn't have enough fabric for the ruffles round the neck and down the front but I also thought these would be impractical for everyday. 

The fabric was very challenging. It is slippery,  springy and frays like mad. I sewed everything together as far as making the ruffles quite quickly. I used french seams throughout which has made the inside very neat and dealt with the fraying issues. I found that everything needed to be tacked first. Pins just didn't keep the layers together in the right place. 

A french seam and the last few tacking stitches still in place
The sleeve ruffles are circular and lined. I took a long time over these because I needed to stop and think at every stage. All of the seams wanted to spring flat and didn't hold a crease well.

Edge stitching around the ruffle edge

After sewing the top layer to the lining I added an extra row of stitching near to the edge to keep the facing in place just like I had around the neck, and this really helped. I then pinned and tacked the two layers together about half way up and close to the sleeve seam before slashing the seam allowance and stitching the facing in place by hand. All this extra care has paid off because the ruffles do hang really nicely.

The underside of the ruffle showing facing
I have made this pattern before so I didn't think I needed a toille. I was wrong. If you look closely at the photos you will see that the bust darts are about 2 inches too high. I don't remember altering the darts on the blouse last time and they are a much better fit. I'm not sure that I can do anything about this now, but because I put so much work into the ruffles and I like the fabric so much that I am going to wear my blouse. My none sewing friends don't seem to notice. 

You can see how the blouse pulls across the front on this photo. 


Most of the time it looks fine...


The back fastening lies flat when I put my arm back down again.


We have passion flowers growing just outside our bedroom window at the moment spilling over the fence from next door. They really are amazing


Wednesday, 5 July 2017

Another Milestone, Another Giveaway


I have now been writing my blog since January and I am still going. I know that lots of you have been blogging for years but I really wasn't sure that I could keep it up. My life as a working Mum gets very busy and I had two worries. The first was that I was taking on a challenge that would take up too much time to be practical and the second was my lack of confidence. I worried that no-one would look at what I was writing and the whole point was to try to make contact with other people like me who love to sew.

This week I am very surprised to say that I have topped 3,000 hits! So a really big thank you to everyone who has had a look at this blog and reassured me that other people are as interested in reading about sewing as I am.

To celebrate this milestone I have two patterns to give away. They are both brand new and haven't been cut.

First is a copy of the Cynthia Rowley pattern that I have used to make my latest dress, Simplicity 1873.

Don't be put off by the pattern photograph like I was initially. This is a good standard dress pattern that I think is very versatile. There are loads of versions of this dress on other blogs and you can see mine here. The pattern is in sizes 6-14. It is designed for woven fabrics but I adapted mine for a fine jersey with 4 way stretch and it worked out well.

Second I have a spare copy of Butterick B5785, size 8-16
I haven't made this yet. It doesn't seem so popular with other bloggers but I do like the simple elegant lines and I will definitely try it at some point. The collar is really interesting. I imagine it made up in a linen fabric or something else quite crisp. If you are the successful winner perhaps you will make your version before I do and could pass on some advice or handy tips.

If you would like to be in with a chance to win these patterns just leave a comment at the bottom letting me know which of my posts is your favourite one so far. You can see a round up of all of the outfits I have made here.

I will be drawing the winner at midnight on Friday 14th July. I am happy to post worldwide to the lucky winner.

Monday, 3 July 2017

A Real Dress at last! Simplicity 1873

When I took part in Me Made May a month or so ago it gave me the opportunity to review my wardrobe and also to look at what other people were making. One thing I realised was that I had a nice collection of dresses but nothing with a waist and a full skirt. One reason for this, I think, is that I often make my clothes from remnants, so I can't always choose how much fabric I buy. I find myself drawn in by a nice pattern not worrying about how much there is to work with.  I have become an expert at squeezing a dress out of not-quite-enough material. I vowed this time to make myself a "proper dress" and looked out for a larger piece of fabric and the right pattern. I made a list of my requirements

1. I wanted a full skirt, perhaps even pleats
2. I planned to make the dress out of jersey so that it had a bit of stretch and would be nice and comfortable to wear.
3. I did not want any pleats or gathers around the neck. 

I was very tempted by the Moneta Dress in all of its versions made for the recent Moneta party. I even went to my local dressmaking shop to treat myself, but they had sold out!

I had this pattern in my stash already, but I had never liked it. I was affected by the photograph on the pattern envelope of a young girl in an ill-fitting party dress which was much too short for me.


But I was looking for a dress pattern so I had a second look and, learning from my experience with the wiggle skirt, I also searched the blogosphere to see whether any one else had made this dress before. 

Although the pattern photograph was discouraging the line drawings seemed to be just want I was looking for. 


A quick search of other people's blogs brought up more versions than any other pattern I have made before, which was very encouraging because there were lots of lovely dresses out there and several people used this pattern more than once, which is always a good recommendation. 


I found a 4 metre length of daisy print jersey with 4 way stretch that I liked. As usual it cost me £1 a metre. It is so soft on the inside and so summery with a really good drape. I also bought a small piece of navy blue jersey lining. This pattern isn't designed for a jersey fabric but I like to experiment and I thought that this fabric would look and feel great made up into a dress.  I decided to make view C but with the longer skirt length. 

Since the pattern wasn't designed for jersey I had to use my initiative and techniques that I had learnt for other jersey projects. I used stay tape to stabilise the armholes and  neck to prevent them from stretching out and this seemed to work well. I decided against overlocked the bodice seams because it is quite closely fitted so flat seams pressed open and were less bulky. I sewed the bodice pieces together with a narrow zigzag stitch then used an over-lock stitch for the skirt seams. The fabric doesn't fray so I didn't need to neaten the seams. 

The lining was stitched to the bodice around the neck and armholes and then pulled right side out through the shoulder seams. This is my preferred was of attaching lining because it gives such a neat finish and avoids fiddly bits of hand sewing. Jersey is always more bulky and doesn't press so sharply. With my choice of fabric I ended up with bulky seams that I trimmed with my pinking shears. I had never tried this before and found that it was a very good technique for trimming and snipping curved seams. What I also discovered was that my family had used my pinking shears for craft work and they were completely blunt. I will need to get a new pair!

In order to get a good finish around the neck and armholes I top-stitched near to the edge. 


The feature of this pattern that I really like is the pleated full skirt. By using pleats instead of gathers the fullness of the skirt lies nice and smooth around the waist. I didn't have any trouble lining up the pleats using the markings and instructions on the tissue paper pattern. 


I inserted an invisible zip down the centre back seam. The instructions tell you to trim the zipper tape level with the neck seam. I am a bit worried about this. I would usually fold the excess zipper tape in to the seam but in this dress there isn't room and it wouldn't lie flat, so I took  deep breath and cut it off. I will have to see whether the zip lasts or whether it unravels, it looks OK so far.  I like the way that the lining is machine stitched right sides together down the centre back along the zip stitching and then turned out. It gives such a neat finish. 


The inside of this dress looks as neat as the right side. The really soft jersey feels lovely against your skin and this dress is very comfortable because of the stretch. 


If I was asked to review this pattern I would say:

Pattern Description
Summer dress in two lengths with or without sleeves. I made view C in the longer length.

Pattern sizing
6-14
I made size 14

Does it look like the photographs on the pattern envelope?
No. Absolutely not, but that is a good thing as far as I am concerned. 

Were the instructions easy to follow?
Yes. And there were some really good techniques to learn.
- the pleated skirt
- a lined bodice with invisible zip

Did you like or dislike this pattern
I like this pattern in the view that I made. I am not sure whether I would make View A with the higher neckline.
I love the smooth lines of the pleated skirt. 
I like the high waist but have read other reviewers who say they lengthened the bodice. I think it feels very comfortable and gives more swing to the skirt, but it is down to personal preference. 

I don't like the instruction to cut off the top of the zipper tape and will think about how to fit the zip differently if I make this again.

Pattern alterations
I made my dress in a jersey fabric which is not one of the recommended fabrics. I needed experience using jersey to adapt some of the instructions but I figured that this pattern was not so different from lots of patterns made for stretch fabrics and it I should be OK. I was prepared to put in a waist stay but in the end I don't seem to need it. 

So now for a photograph of me posing in my new dress. 


If you have made this pattern let me know how you found it and if you have any tips to share. 

Happy sewing...