Sunday 29 October 2017

Pencil Skirt Pattern Hack - The Maker's Atelier


I have now made three pencil skirts using Frances Tovin's pattern in the Maker's Atelier book. I have written about my first pink floral version here, you can see the black sparkly version here and the blue one is yet to be blogged.


This is proving to be such an easy, versatile jersey skirt pattern that I can see I will be making more. It is a great stash buster but also provides a good pattern to make a quick shirt to compliment the other things in my wardrobe.

I needed a new black pencil skirt for work. I have been wearing the same RTW skirt for years. I shortened it some time ago to keep up with modern fashions and it is now a bit tight and getting rather worn. I had already bought a length of black suiting and some lining to make a replacement but I decided instead to try the pencil skirt pattern hack. This line drawing shows exactly how the skirt is put together.


I bought a length of textured, black jersey in a medium weight. I was drawn to this fabric by its interesting textured surface. This has been difficult to photograph on such a dark fabric but hopefully the picture below gives you some idea of the texture.


The instructions for the pencil skirt hack were simple and easy to follow. Using the original pencil skirt pattern, Francis tells you to trim a 9cm strip off the side seam. I made another pattern in newspaper, moved the pattern over by 9cm all the way along and cut along the curved edge.


The side panels are each made from a rectangle 20 x 75cm.

I cut out the pattern pieces quickly and in no time at all I had made up my new skirt. Yippee!


I like the added interest of the princess seams on this plain fabric and I am glad that I tried this variation rather than just making another plain pencil skirt. The elasticated waist band is very comfortable to wear. I have generally found that a zigzag stitch is the best stitch to finish the elastic casing around the waist and a twin needle is better for the hem. I tested out each stitch on a fabric scrap before stitching the finished garment. The stretch fabric makes this narrow skirt easy to walk in, but it still has a flattering silhouette.  

This skirt is a very useful addition to my wardrobe. It goes with lots of tops that I have already made so here are two more that I have tried.

Worn with my flutter sleeve blouse
The back view paired with my long sleeved striped T-shirt

Looking very pleased with myself wearing yesterday's T-shirt with today's quick skirt
This pattern is so easy. It hasn't challenged me to learn new skills and it can't really be described as an interesting make. The secret of its success for me is that I can run up a skirt so quickly to suit any occasion. This black skirt is an understated, wardrobe basic but if I choose a beautiful fabric I can also make something more dramatic for a special occasion.

Do you have a pattern that you love and have made over and over again. Please leave a comment below and share your recommendations.

Saturday 28 October 2017

Striped T-shirt - Another Butterick 6258

October has been a very busy month for me, which has had an impact on my sewing and my blog, but after a break of several weeks here I am again, and its good to be back. At the beginning of the month both of my older sons went back to university for the new academic year. They are both studying on the same city and after a family day out involving two car loads of belongings, they are both settled in well. The house seems very quiet without them around and I have gone back to using my smaller pans to cook. There is also significantly less washing to do but this doesn't seem to have freed up much more sewing time. 

On 12th October my parents celebrated their 60th wedding anniversary with a small tea party for friends and family. They received a card from the queen to congratulate them for reaching this amazing milestone. 

Almost immediately after the anniversary party it was half term here so we went away for a short break in Somerset with our youngest son. We stayed in a lovely cottage on a farm near to the small village of Bicknoller. The UK caught the tail end of storm Ophelia while we were away. We travelled down to Somerset with an eerie orange light in the sky and initially had very mild weather followed by some rain but despite the uncertain weather we have a really good break.

Now that things are back to normal I have resumed sewing and have lots of projects panned as usual. While I was out doing a pre-university shop I was tempted by some interesting striped fabric that I thought would make a nice long sleeved T-shirt. I liked the burgundy stripe and I didn't notice at the time that this was a border print. The coloured stripe is green on one side of the fabric graduating to burgundy. I had just enough of this fabric to use the green stripes around the bottom of the T-shirt front and back,  but not enough to include green stripes on the sleeves.


I used Butterick 6528, which I have used twice before to make long sleeved T-shirts, here and here. It is a simple and reliable pattern which sews up quickly. The Reindeer T-Shirt hasn't been worn so much over the summer months but my Aqua T-Shirt is a good friend that I  wear all the time.


I used lots of pins to make sure that I matched the stripes when I was cutting out the front and back pieces on the fold and I cut the two sleeves separately to make sure that the stripes matched. I pinned through each of  the narrowest white stripes to ensure a good match at the seams before stitching them and this worked well. I am especially pleased with the way the stripes match on the sleeve heads. This will never be exact because the top of the sleeve is larger than the armscye, but this is good enough for me. There is a very good tutorial on sewing with stripes on the Tilly and the Buttons website, here, which I would highly recommend if you haven't tried this before.


All of the internal seams are stitched with the overlock stitch on my sewing machine. I used white cotton inside the shirt for a neat finish.


The shoulder seams have been stabilised with another piece of the seam tape that my grandmother gave me many years ago. She was a very talented seamstress and I always remember her when I incorporate something of hers into a garment.


I top stitched all of the hems on this T-shirt with a twin needle. I used black cotton for the top stitch details. This is only really visible around the neck where the stitching crosses the stripes. The rest of the top stitching is hidden against black stripes around the sleeves and the shirt hem.


I am very pleased with this top and am sure that I will get lots of wear out of it. These photos unfortunately don't show the colour of the contrasting stripes very well.


The sleeves on this shirt have been shortened to a 3/4 length. This is my favourite length. I am always pushing me sleeves up in the kitchen and at work, so a slightly shorter sleeve suits me better.


Saturday 7 October 2017

Hula Hooping for a trim waist


I have mentioned before that as I am getting older I seem to be loosing my waist and becoming more rectangular in shape. I always need to adjust patterns now by adding extra to the waist before I cut them out and I suppose that I had resigned myself to this thinking it was inevitable that our bodies will change over time. I have read posts from other bloggers about taking up running or going to the gym but this wasn't for me. But, I have worried about the amount of time I spend at work all day sitting completely still in front of my computer. I try to go for a brisk walk at lunch time but I was looking for an exercise regime that I could do at home and wouldn't take up too much time. 

Exercise came up in conversation with my friend Sharon. She told me that she had begun exercising in the lead up to her daughter's wedding so that she would look her best in her Mother-of-the-Bride dress and she recommended exercising with a weighted hula hoop. This seemed like a great idea. I had never been able to hula hoop at school but I reasoned that if Sharon could master the skill, with practice, so could I.  

The very next Saturday I purchased my hoop. It is adult sized and weighted. When everyone was out of the house at school and work on Monday I put it together and had a go. I found lots of videos on You Tube to give me advice about my technique and by the time my family came home I was able to keep my hoop spinning round my waist, at least for a while.


I set myself a realistic target of 5 minutes practice every morning and evening.

After the first day I had a large, painful bruise on one hip but I was enthusiastic to carry on and since that first day I haven't had any more bruises. I quickly started to feel my muscles beginning to respond to the regular exercise and I began to feel better, but I wasn't expecting instant results.  I had read lots of claims on the internet about the benefits of hula hooping but I work on the premise that if something sounds too good to be true it probably is and these claims seemed to fall into that category. 

Now, I am a home dressmaker and I measure myself fairly regularly. I know what my measurements are and they don't really change much. My measurements are 97-87-97. 

On the Friday after I started to practice with my hoop I was sewing the Thai wrap trousers. I cut the waist to my usual measurements and attached the waist ties and then I tried them on. The trousers were rather loose at the waist and slipped down to rest on my hips. I thought I must have stretched the seam out as I was sewing so I took the trousers off and measured them, but they measured 87 cm. I tried them on again and tied them up as tight as they would go... They were still a bit loose... so I measured myself to check... 84 cm round my waist!!
My waist measurement had come down by 3 cm in 5 days!


I kept on practising, 5 minutes in the morning and 5 minutes in the evening, and after 10 days my waist measured 81 cm - 6 cm thinner than I was before I started hula hooping. I can feel and see the difference. I haven't lost any weight, just begun to change shape, but then I am not on a diet.  I have to admit that I am genuinely amazed and really pleased. I wore a dress the other day that has always been a bit tight around the waist and it fits better than it ever did before. I plan to carry on hula hooping. It takes me about 5 minutes to do 250 turns in both directions and sometimes the hoop drops several times but the more I practice the better I will get.


Does anyone else have a favourite type of exercise that they would recommend for keeping fit and staying slim. Please let me know.


Monday 2 October 2017

Thai Wrap trousers - A Pyjama Pattern Hack


A couple of weeks ago my friend Netta wore a beautiful long wrap skirt/trousers to church. We all admired her new outfit, which had been a present from her son, who had just come back from a holiday in Thailand. I had never seen wrap-around trousers like hers before and I was fascinated. Netta kindly let me have a look at the fabric and the construction so that I could try to make a pair for myself.

Once I got home a quick search on google for wrap trouser patterns showed me that what Netta's son had given her were Thai Wrap Pants, Sarong Pants or fisherman's trousers and there were lots of posts, blogs and vlogs showing you how to draft a pattern and make your own. 


I bought 2 metres of this lovely, drapey, viscose fabric from Leicester market for just £1.50 a metre to experiment with. I had a vision of a pair of loose fitting wrap trousers which might not be suitable for the colder weather that is on the way but would be ideal for the Christmas party season and would come out again next summer.

All of the patterns and instructions I saw on line were drafted free-hand but I decided to base my design on my pyjama trouser pattern. The fabric wasn't expensive but I didn't want to make a mistake and have ill-fitting trousers. I wanted mine to look good enough to wear out in the evening, not just for the beach. So, now I confess that, when I made the pyjama trousers in my last post here I was already planning ahead and testing a pattern ready to make this new project. My first pair of pyjama trousers, made from the lilac cotton, came up a bit too big and certainly too loose for evening trousers. I was much happier with the second pair so I based my wrap trousers on the smaller pyjama trousers.


Following the instructions I had read on line, I cut the 2 metres of viscose into 2 pieces each measuring a metre long. First I trimmed a 5cm strip from the selvage edges of each piece giving me 4  x metre-long strips to use for the waist ties.  I folded each large piece in half length-ways and laid one piece of the pyjama trouser pattern on each.

Trouser pattern pinned to the fabric near to the folded edge
Then I only cut along the inside leg and centre front seams of the trousers keeping the excess fabric on the outside leg seam to make the wrap-over.

Double layer of fabric cut along the inside leg and centre front only
I sewed French seams on the inside leg seams just as I had when I made the pyjama trousers and neatened the crotch seam with the overlocking stitch from my sewing machine. This fabric frayed really badly so it was very important to neaten all of the seams.

French seam and overlocked crotch seam. 
Then I measured the waist at the back and front of my trousers and cut these so that they were each long enough to go all the way around my waist with a 5cm allowance at each end for a nice wide side seam. I pressed the side hems and stitched them with a straight machine stitch. These wide hems lie  flat and didn't stretch out at all when I stitched them. They give the wrap-over sections a firm edge that hangs down neatly when the trousers are worn. I think that a narrow hem could have been rather wavy.

2cm wide side hems. 
I joined two of the narrow strips together to make each waist tie (If I make wrap trousers again I will cut the ties before I cut my fabric in half to avoid having to join them together again, but I didn't plan that far ahead this time). My fabric was very soft so I interfaced the central waistband section with a strip of medium weight. iron on interfacing half as wide as the band. I attached the waistbands right sides together to the top of the front  and then the back of the trousers taking a 3cm seam allowance. Once the waist band section was attached I folded the ties in half length-ways, right sides together and stitched all the way to the ends to form two ties on each side of my trousers. Then I clipped the corners and turned the ties right sides out.

Inside waist-band and ties
I decided to hand stitch the inside edge of the waist band in place to make sure it looked neat.

Detail of the machine-stitched hem
Then I tried on my trousers and took up the hem at the bottom to the right length.

A before and after the diet photo!!
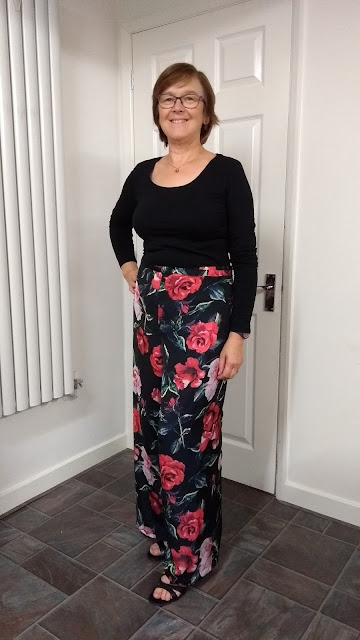
I am so pleased with these wrap trousers. They are very similar in style to the pair that I admired and set out to copy. I have tried tying them with a front and rear overlap and I think that I prefer the overlap at the back giving a smooth, neat front panel, what do you think?


I only had one problem during the construction, which really wasn't a sewing problem at all, and I will tell you about that in my next post...