Wednesday 20 September 2017

My Cupboard of Dreams and Some New Pyjama Trousers

Earlier this month I signed up for Sew My Stash with Jo from Stuff Jo Has Made. I think I have quite a sizeable stash compared to Jo... I am very easily tempted by a nice piece of fabric but I always have an idea about what I will make when I buy something. Here are just a few of the fabrics that I have in my stash.


I feel very lucky that my husband, Mr Stitch on the Line, has picked up some useful DIY skills over the years and has recently retired. Lots of jobs that needed doing in our house are being done and one of these jobs was putting up some shelves in the spare wardrobe to accommodate my fabric collection and the camping equipment.


In this cupboard I sort my fabric pieces into three categories. All of the fabric on the top shelf is woven, the fabric on the lower shelf is knitted. By folding and stacking the pieces I can easily see what I have so that I don't loose track of what I have bought. 


The third shelf contains the remnants of things I have made previously rolled into neat bundles, a box of knitting wool and a box of sheer fabrics that won't sit in a pile, but keep rolling off the shelf if I shack them.

I think of this cupboard as my "Cupboard of Dreams". Each piece of fabric has potential. Some are practical and some are just beautiful. Some are warm for winter and some are cool for summer. I have plans for everything but these plans are fluid and that is where the dreams come in. Dressmaking is a hobby that I do for pleasure so it needs to be fun - and it is.

Having shown you my stash I felt inspired to find some nice fabric to make new pyjama trousers. The old RTW pyjamas that I had last autumn were so well worn that they were ready to fall into shreds in the bed if I wore them again so I had a rummage through the woven section of my stash to find two vintage sheets that I bought a while ago with a view to making new pyjamas. 


I also have a pattern for pyjamas in my collection so I didn't need to buy anything to complete this project. The pattern I chose was Simplicity 2481. The recommended fabrics include Gingham, laundered cotton and Chambray which seemed close enough to my soft sheeting.


I was only looking for a pattern for the trousers to begin with. I like to wear a jersey pyjama top and already have some T-shirts that will fit the bill. Making 2 pairs of pyjama trousers for the autumn was a nice quick project. 

I made the first pair using the lilac fabric and chose a medium size which seemed closest to my measurements. I stitched the inside and outside leg seams with french seams and overlocked the crotch seam to give a neat finish inside. I chose not to add the patch pocket to the trouser leg. I never understand the point of having a pocket in your pyjamas, especially when it is halfway down your leg where you can't reach it!

I sewed these trousers together quickly and now that they are finished I do think they are a bit big. I thought about making some adjustments but I had sewn French seams and couldn't face unpicking them. These are only pyjama trousers after all. I had to cut quite a lot off the top and bottom of the trousers, which I put down to me begin only 5ft  4 inches tall. This is a unisex pattern which you could be using to make trousers for someone much taller than me.


Because these were rather loose fitting I made my second pair in the smaller size and I am much happier with the fit, but both pairs are comfortable and will get lots of wear. I love the vintage floral fabric, especially the aqua and green colour. 


I have added a little innovation of my own. I always find it difficult to tell which way round to wear home made pyjama trousers. They don't have a label in the back to help you like shop bought clothes. I have sewn a loop of ribbon into the back of my waistband which will serve two purposes. Firstly, it makes it very easy for me to find the back and secondly it will be also useful on holiday. I can hang my pyjama trousers up by this loop in the camp site showers and there will be no danger of them falling off the hook onto the wet floor.


Do you make any additions to the things that you make that you can share? I am learning so much since I started to read sewing blogs and it is great to be able to share in this way. 

Saturday 16 September 2017

The Book Bag - The Maker's Atelier

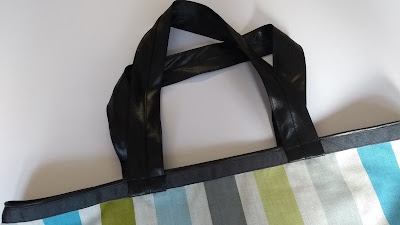
Autumn seems to have arrived here and I have had a great time wearing my new skirts and top to work this week. To complete my outfit I decided to try making the large Book Bag from The Maker's Atelier book. I had some leather-look jersey that I originally bought thinking I might make a skirt, but I also thought this might make a nice bag. 


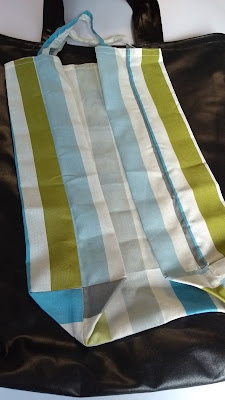
I chose the biggest size of bag because I often need to carry files as well as my umbrella, diary, pencil case and something for lunch. My jersey fabric was light and a bit stretchy so I decided to line my bag to prevent it from stretching when it was loaded with things. I used a piece of striped cotton to make the lining. I have signed up to Sew My Stash September with Jo from Stuff Jo has Made so this fits in with the challenge to use the fabric I have in my stash.


The instructions for the bag were nice and detailed with plenty of diagrams. There were no pattern pieces but all of the measurements were there for two sizes of bag, both lined and unlined. I measured all of the pieces and cut them out before I began to sew. I did get a bit confused when it came to lining the bag because the instructions for the lining refer to the smaller bag and I was making the large one, but with a bit of common sense I sorted it out and I think the bag turned out well. My large Book Bag is a bit of an amalgamation of the large and small bags described in the book. I think this is probably in the spirit of  the whole book. These are basic patterns which are intended as a starting point to design your own projects once you are familiar with them. 

So. The dimensions of my book bag are 56 x 48cm. The handles are 54cm long. This is long enough for me to carry the bag on my shoulder, which I like to do.


The bottom corners of the bag are squared off as you can see in the photo above. I didn't trim off the corners but folded them under the base and stitched in the ditch to give the base of the bag extra body and strength. I think this has worked well since my fabric is quite soft. If I had used firmer fabric I would probably have trimmed the corners to reduce bulk.  

After I attached the lining to the main bag I reinforced the top of the bad with grossgrain ribbon.


The top of my bag is now nice and strong. The handles are securely attached and I have two rows of  top stitching running around the top on the outside.


I had plenty of the striped lining fabric left when my bag was finished so I used this to make a smaller, unlined version of my Book Bag. 


This small bag rolls up and fastens with a strap so that I can carry it inside the larger bag. I will always have a bag with me now if I need to buy something and I like the fact that my bags match. I feel quite stylish and coordinated!


Sunday 10 September 2017

The Drape Front Top - The Maker's Atelier

After my success with the pencil skirt I was really keen to try the Drape Front Top. This is another simple pattern with 2 pieces. I had a beautiful piece of bronze coloured jersey with a lovely drape which I had had for some time with a view to making a short sleeved top and it seemed ideal for this project. This top went together quickly and easily and begin a very loose fit there were no fitting issues to consider. I made the size 3/4.


I tried the top on Flossie, my dress form, and I was pleased with the drape which showed off the shine on the fabric very nicely. I was also pleased with the back view which hung in vertical lines.


When I tried the top on and looked in the mirror I have to say that this is probably the most unflattering top that I have ever made. I was so disappointed. I put the top back on Flossie and it looked good on her. I hung it on a hanger and it looked even better. 


So I put the top on and experimented with the drape neck to try to make it look nice, but without success. I put this top on so many times and I have done so much posing in front off the mirror but have had to admit defeat. It just looks awful. 

I hate to be defeated... 

I went back to the pattern photos and the instructions. Looking closely at the models in the Maker's Atelier book, their tops have more of a scooped neckline whereas mine is round and quite close around my neck where I think it emphasises my wrinkles. 
The neck on my top is very narrow across the back. The pattern instructions say that you need 12 inches of bias binding. My finished neck is just 6 inches wide so I wondered whether I had pulled in the bias binding when I was stitching. I had taken great care not to stretch the neck out as the instructions advised, so I took the binding off and tried my top on again but the neck still seemed too narrow. I pulled on it but despite it being a stretch fabric I could only stretch it out by about another inch or so and this didn't make it look any better. 

The other thing I didn't like was the way the drapes on the blouse hung either side of my bust in a very unflattering way. None of the examples in the book look like this. 

On the other hand I love the fabric so I gave up the idea of a drape fronted top for the moment and went back to a tried and tested top that I have made in February here.  This is New Look 6217. 

I kept some features from the drape front top that I really liked. I cut some more bias binding from a printed cotton that I have in my stash and used it to neaten the neck edge. This is hidden when I am wearing my top but I like having  nice finishing touches on the inside. 


The drape neck top was hemmed with a narrow zigzag which gave it a simple, decorative finish that I really liked. I hemmed the second top with the same narrow zigzag. 


Like my first version of this blouse it pulls over my head without needing a fastening at the neck and the centre back seam isn't really needed, but I think these details add a bit of interest so I kept the button and loop fastening. 


I feel much more comfortable in my second version of the bronze top. It is figure skimming and much more flattering. 

Once I had resolved the issues with the bronze top I was on a roll, so I made another stretch pencil skirt in a black jersey with gold flecks, which I think also goes well with my new top. I can see this skirt pattern being a real stash buster.


But... As I said above, I hate to be defeated by a pattern. I am very tempted to have another go at making a drape fronted top and this time cutting a wider neck. 


Wednesday 6 September 2017

Stretch Pencil Skirt - The Maker's Atelier


As soon as I got home from holiday I couldn't wait to get started and make something from my new book, The Maker's Atelier by Frances Tobin. I started at the beginning with the Stretch Pencil Skirt. I have to admit that I was a bit sceptical. This is a basic tube-skirt with 2 identical pieces, no darts and it has elastic at the waist. I have tried skirt patterns like this before and always ended up throwing them away. They have been bunchy round the waist  and they looked rather like a sack! I was in for a very nice surprise!!!

I cut my new skirt out of 1 metre of scuba from my stash and started to sew. This skirt is nicely shaped over the hips and narrows towards the hem. Two side seams later and it began to take shape. I turned over the top with a zig zag stitch and used a twin needle to finish the hem, then I  threaded some wide elastic around the top and I was finished. I have a lovely new skirt for work that is very comfortable to wear. The stretch in the fabric is just enough for me to walk easily. It is longer than my old pencil skirts and it makes me feel feminine and shapely.

Frances Tobin says that she has 25 versions of this skirt in her wardrobe and I can quite believe it. I have already started to plan others from my stash in a range of colours and patterns, but before I make another skirt I am going to try the Drape Front Top in a bronze coloured soft jersey. My aim is to work my way through the patterns in the book to try them and see if they will inject the sense of style I am looking for into my wardrobe. Of course I will be tempted to make other things along the way and I will  mix and match with old favourites but I feel quite excited as I start this new project.

Here are some more photos of my skirt. No head I am afraid, its a bad hair day!!


I would really appreciate your feedback because in a household full of men it is difficult to get an objective opinion about anything that I make or wear. Some female contributions would be gratefully received.

Monday 4 September 2017

The Search for the Holy Grail or Sewing with Style - The Maker's Atelier

In mythology the Holy Grail is the cup used by Jesus at the last supper and there are lots of legends about knights in medieval times looking for this treasure, the latest being the film Indiana Jones and the Last Crusade. On Wikipedia the Holy Grail is also described as "a thing which is eagerly pursued or sought after". I am about to start on a search for my personal holy grail and it is something that has always seemed to allude me.

As Autumn approaches and the new school term begins I have been looking at my winter wardrobe and I want to make some changes. Since I started my blog in January I have sewn more regularly and I know my sewing technique has improved with practice. I have also made a lot more things from jersey fabric and learnt some new skills. But, when I look at my wardrobe and at my blog photos I feel as though something is missing and that thing is "Style". I have made some nice things which I am proud of and wear a lot, but I have a wardrobe full of individual items that don't really go together. My sewing has lacked direction. I have been tempted by the next lovely piece of fabric or interesting pattern without having a master plan.

Over the summer I decided to try to find a style that I could develop and make my own. I knew that I would need a lot of help since I have never been all that stylish. I always seem to have been too busy and other things got in the way. I had another birthday in July so I decided to put this to good use and asked for a copy of the new book, The Maker's Atelier: The Essential Collection, Sewing with Style by Frances Tobin, which was published in February. 


The clue was in the title "Sewing with Style"and Amazon had this to say,

"A career in fashion, a love of fabrics, a lifetime making clothes, a keen sense of styles that work for women of all ages and shapes: this is the perfect cocktail of skills and passion that make Frances Tobin's patterns for The Maker's Atelier so successful."

I fall into the category - women of all ages and shapes, so I took the book on holiday and I have read it from cover to cover. It is a really good read. Frances explains how she developed each pattern and talks about her lifetime of sewing and designing. The book tells an interesting story as well as being full of sewing instructions and advice on fabric choices. 

This is also a really beautiful book. It has a single colour pallet all the way through and the photographs are beautiful. The pale colours enable you to see the construction of the garments which are all accompanied with photographs suggesting how you can put the items together to make up your wardrobe.

Frances seems to have thought of everything. This book has a soft cover which closes with a magnetic strip on the back that holds everything together. The book folds out and the pages lie flat so that you can easily refer to the instructions as you work. 


All of the patterns are printed on sturdy paper and are folded into the wallet on the right hand side. The patterns are printed double sided and you do have to trace them off but they don't overlap so this is not a difficult task. 

The style is pared back and simple. I think this style looks achievable for me and will fit into my busy lifestyle. Frances Tobin developed these patterns for herself and there she is in her book looking very stylish. 

I have found some reviews of the book including a video on the Fold Line, which have all been very positive, but I haven't been able to find many examples of bloggers making the patterns, perhaps because the book is still quite new. So I am about to start out on a new sewing adventure. I have already begun with a stretch pencil skirt, all good so far, and will post this as soon as I have the photos. My plan is to work my way through the patterns adding ideas of my own as I go along to create a wardrobe for work that will inject a bit more style into my life. I hope that along the way I might find my Holy Grail. I would welcome ideas and suggestions as I go along, so please feel free to leave any comments to help me on my way.