Tuesday, 27 June 2017

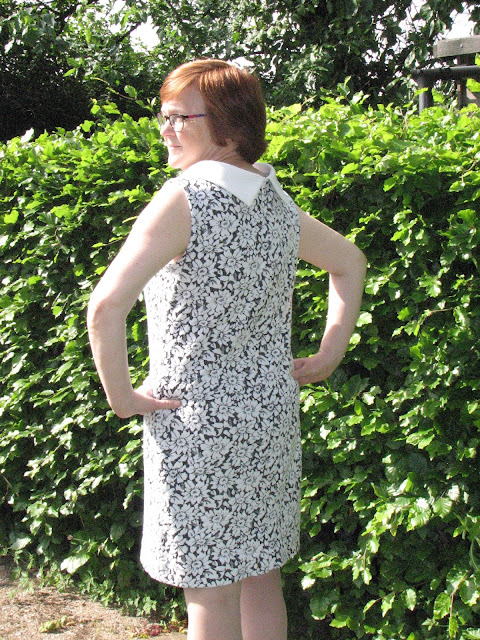
A-Line Summer Dress, New Look K6263


We are having some really hot weather for the UK at the moment and summer dresses are my favourite thing to wear to work in the hot weather. Paired with a light cardigan, I can manage the heat outside and the cool of the air conditioning in the office. 

I have had this beautiful fabric in my stash for a while. It is a soft, lightweight jersey and I love the way that the red and pink go together. It has a strong 60's vibe, which seems to be a theme in my sewing at the moment, so I wanted a pattern that would compliment this. The remnant that I bought was just 1 1/2 metres long which also limited my choice of pattern.


Among my patterns I had New Look K6263 and that seemed the ideal choice.


The pattern isn't designed for stretch fabrics but I think it needs something with a bit of body that drapes well so decided to take a risk. I chose to make view A because I liked the keyhole neck detail, but the bow was much too fussy for me. It is a loose, flowing dress without a fitted waist so I cut a size 12, which is my RTW size, when I often make a size 14. The pattern has 11.5cm ease or 4 1/2 inches which does seem a lot and isn't necessary with a stretch fabric. In the end I was very glad that I didn't make a larger size because I think my dress is a good fit. My bra straps lie comfortably under the neck band and I think that the arm holes would have gaped if I had made a larger size.

I cut a contrasting neck band from some of the fabric left over from the collar of my summer shift dress. I think the contrasting colour highlights the construction features nicely.


I found the neckband quite challenging to put together. The first step was to apply facing to the V


I use a light weight, fusible interfacing which I neatened around the edge with a simple zigzag stitch to avoid it becoming bulky. The pattern suggested under-stitching around the V but my fabric pressed well and this didn't seem necessary. I trimmed the seam allowance close to the seam and I haven't had any problems with it lying flat.   

The armholes were trimmed with bias binding. The back opening was just turned in and hemmed by machine. This was all quite straightforward. I used traditional 5/8th inch seams using a narrow zigzag to allow for the stretch


From that point on things began to get more challenging. The neckband is made up of 6 pieces of fabric plus 3 pieces of interfacing. It was very important to mark the dots and notches accurately because these were key to stitching the band in the right places before attaching it to the dress. There were 13 steps altogether to make the neckband and sew it to the dress. The instructions were clear and the diagrams were very helpful, but this definitely isn't a pattern I could have put together without reading to instruction sheet. In the end it all fell neatly into place and it looks deceptively simple, just a plain white band on a simple shift dress!!


I am very pleased with the details at the back of the neck. I made narrow rouleau loops from the white jersey fabric and used two vintage buttons from a collection my great aunt gave me, so this dress holds some extra family memories for me. 


The fabric is soft, light and drapes well. I especially like the A-Line shape, which skims my figure in all the right places, and it is very comfortable to wear. I think I would consider making it again some time but the next thing I want to make is a "real dress". I have made lots of straight shift dresses and am really looking forward to making a bodice, a fitted waist and a full skirt. 

So for now here are a few more photos of a dress that makes me want to twirl!


Bye for now,  
Rosemary

Saturday, 17 June 2017

Simple Sew, Wiggle Skirt


Taking part in Me Made May '17 last month identified one gap in my wardrobe which I addressed straight way. I needed more separates to wear for work during the week. I had a number of tops with purple in the design which I was wearing with a black M&S skirt that had seen better days and was a bit tight, so I decided to make a new skirt. My go-to skirt pattern has been the pencil skirt from the Great British Sewing Bee book, series one. I have made three variations of this skirt pattern, all in stretch jersey, and I fancied a change. I was looking for something a bit more shapely and a bit smarter.

In my pattern collection I have the Two-in-One skirt pattern from Simple Sew. This looked like just what I needed.


I chose the Wiggle Skirt version and bought 1.5 metres of light weight purple suiting with 1 metre of lining because I wanted to line my skirt to stop it from clinging.

My measurements coincided with size 10 on the hips and I graded up to size 14 at the waist. As I have got older I have found that my waist has filled out and I no longer have an hour glass shape but I am more of a rectangle now. I often have to let out patterns at the waist. I have heard lots of other dressmakers say the same thing and I think we just change shape with age. We start life as a D shape with straight back and rounded tummy, develop curves in our teens and then later on in life everything changes again.

This skirt was easy to make and came together quickly. Just like the pattern suggests, it was a simple sew. The fabric I  chose frayed badly so I used the overlock stitch on my machine to neaten all of the raw edges as the pattern advised.

I cut the lining from the same pattern pieces as the skirt and made it up in exactly the same way, except that I only wanted the lining to come down as far as the top of the back slit. I measured the required length, added 2 inches for a hem allowance and cut the acetate lining fabric to the right length.


When both the skirt and lining pieces were sewn together I matched up the lining and skirt wrong sides together and tacked them at the waist seam. Then I sewed them both to the waist band and continued to follow the pattern instructions. Stitching in the ditch from the right side has left a slightly uneven finish on the inside where no-one can see it.


I slip stitched the lining to the zip tape to neaten the opening and prevent the lining from getting caught in the zip when I pull it up.

I am pleased with the fit of this skirt, although it doesn't have quite such a curvy silhouette as I expected. I think I will make it a little bit tighter round the waist if I make it again.  Mine does seem more of a pencil skirt shape than a wiggle skirt, but this may be due to me not having a very slim waist.


This side view shows the slight gaping at the waist


My invisible zip was very stiff at the top so it wasn't possible to line it up with the top of the waist band. I have added a hook and loop to bring the top together neatly and that seems to have solved the problem.


I love the slit at the back and the way it lets me walk freely. Despite the slim silhouette I can still walk easily, which is very important.

After finishing the skirt I looked on line and found the tutorial by Gabby from Gabberdashery here and I wish I had seen this before I made my version. It was an easy skirt to make, but Gabby made a few improvements that I wish I had thought of, and seeing someone else make the skirt would have made the instructions so much clearer to follow. For example, Gabby used french seams for her side seams. This would have solved my fraying issues and given a much neater finish. I also like the way that Gabby doubled over the wide allowance by the back split. I just neatened mine and folded it back.

I am still experimenting to find tops that compliment this colour. This RTW butterfly top seems to look good and plain white or black are also OK. The tops I tried during May were less successful, mainly because they were loose fitting. I plan to make more fitted tops and to pay more attention to the fit as a result of seeing so many photographs of myself in my day to day wear.


My husband is very pleased with his refurbished pond surround which features in these photographs. Our garden is another work in progress which is being documented as the backdrop to my sewing projects. It will be good to look back on these pictures in the future and be reminded of the changes.

Saturday, 10 June 2017

Summer Shift Dress, New Look 6145


Here is a third version of my favourite shift dress. I have made two before here and wear them all the time but they are a bit too warm at this time of year. This pattern is a real favourite of mine. It is so easy to make and fits me well without any adjustments. I make a size 12.

My previous versions have sleeves but for the summer I decided to try a different one. This is view E which, I believe was the version featured in the 2015 issue of Sew magazine when the pattern was given away. I found a lovely dress made by A Certain Style back in 2015 and I hope she won't mind me using this pattern photo, which shows the magazine page.


The jersey I chose to make this dress is the perfect mid season fabric. It has body and is quite thick. It has proved to be a good choice with a cardigan on cool days and on its own when the sun comes out. It was ideal for our very changeable May weather.

I used an off white, crepe jersey for the collar that matches the white flowers but was fine enough to sit well when it was folded. I am pleased with the sixties look, especially the back view.


This dress pulls on and off over my head but I have still used an invisible zip to give it a good finish. The fabric was very forgiving and I have to say that this zip lives up to it's name. It really is invisible!


The facings on the pattern are interesting. The neck facing is conventional. I used interfacing and the extra crispness that this gave to the facing helps it to sit flat and not roll out. I have edged the neck facing with a short length of lilac bias binding that was left over from another project. This isn't necessary, because my jersey fabric doesn't fray at all, but it feels good to know that I have this contrasting feature inside the dress, even though no-one else can see it. The binding also anchors the iron on interfacing which always comes unstuck with washing eventually.


The pattern instructions tell you to make a bias facing strip for the arm holes. The binding is turned completely inside and top stitched. I had never done this before and my fabric was very thick, but I followed the instructions and I like the finished result.  The armholes are firm and neat and the garment has structure. I will add this technique to my other sewing skills and may well use it again on other sleeveless tops instead of the usual armhole facing. I have included the instructions below in case you would like to try this technique.


And here you can see how neat the armhole finish is.


I wore this dress in May before posting it here. It is comfortable and makes me feel stylish. The 60s vibe, especially the reverse collar, takes me back to my childhood when my Mum and her friends were wearing dresses like this. I will happily make this dress again if the right fabric comes along and I think this one is going to get a lot of wear.


Monday, 5 June 2017

Me Made May Roundup

This is the pledge that I made on 3rd April 2017.

'I, Rosemary of http://stitchontheline.blogspot.co.uk, sign up as a participant of Me-Made-May '17. I will endeavour to wear one me-made item each day including weekends for the duration of May 2017 and to make my first pair of jeans'

So - How did it go? Well, I did managed to wear at least one Me-Made item each day for the whole month, I didn't repeat many and on a few days I wore more than one. It was a challenge. Sometimes I felt really positive and at other times I wondered why I had put myself under so much pressure, especially when things got very busy. My husband was great, taking photos without complaining even when I didn't like the results and we had to do them over again. There were a few days when I cheated a bit and used a photo from my blog instead of taking a new one, but I can assure you that I did wear the outfit.

Here is a selection of some of my favourites


Successes
Looking back, I am pleased that I managed to wear something a bit different every day for a whole month. If you would like to take a look you can find week one here, week two here, week three here, week four here and the last three days in week 5 here . I needed to use a bit more imagination when I was getting dressed in the morning and this led to me getting out some old friends that I hadn't worn for some time, like this blue sparkly dress, which had been in my wardrobe and been overlooked for ages.


I saw myself in some outfits that I don't think I will wear again... And I learnt the importance of wearing the right underwear! This outfit reminds me so much of the Teletubbiess houses and I shall be careful not to wear a t-shirt bra under a jumper again


I really enjoyed looking at everyone else's makes and my head is buzzing with plans for things I would like to sew. I am not new to sewing but I am new to blogging and I feel like a child in a sweet shop. Every day I find a new blog that I like and I pour over the lovely things that I see there. I currently have three outfits cut out but not finished. (I am not sure whether this is progress. I will have to keep an eye on it because I could get carried away!)


First is a real summer dress in soft jersey that is nearly finished; apart from the zip and hem. Taking part in Me Made May showed me that I don't have any classic dresses with a full skirt so I am having a go at this Cynthia Rowley pattern, which seems to be very popular with other bloggers.


Second is a blouse which I have made before here. It is a vintage Woman's Realm pattern and I have chosen the version with the 3/4 length flutter sleeves because they seem to be back in fashion right now. 

My third project is this shirt dress.


I have never used a Threadcount pattern before and haven't found many reviews for these patterns, which came free with Love Sewing magazine. The pieces are all cut out and ready to go but I haven't sewn the first stitch yet. I will let you know how I get on but I have a lot of work ahead of me so I may not get this one finished for some time. 

I have confirmed that I like dresses. I make a lot of dresses because they are good for work and are quite expensive to buy. My work dresses get a lot of wear but I usually had a current favourite that I wear all the time. This month it would have been the pink flowery dress but this challenge has made me wear a more varied selection.  

My wardrobe has proved to be short of Me Made separates for the weekends. I struggled to find a variety of things to wear this month when I wasn't at work - but, I am not really short of t-shirts and jumpers, I just didn't make them myself. I have some lovely t-shirts from Australia that were presents from my sister and that I really enjoy wearing and some nice warm RTW jumpers. My first thought was that I needed to make some casual tops, but now I am reconsidering. Is this really necessary? Isn't it better to use what I have and not to make things that I don't really need. What do you think about this? Surely we should be using our sewing skills to help us to have a more sustainable lifestyle and not as an excuse to make more things than we need.

Failures
I challenged myself to make a pair of jeans before the end of the month. I have completely failed in this part of the challenge. I haven't even bought the fabric yet, although I have a pattern, McCalls 5894.
I set this part of the challenge for myself because of Zoe's encouragement for us to stretch ourselves and get the most out of our pledge. In April I didn't anticipate how busy I would be in May. I don't feel at all bad that I didn't manage the jeans. By the middle of the month I accepted that it just wasn't going to be possible and set aside that part of the challenge. I will make some jeans but just not now.

In summary
I have loved being part of Me Made May. I have made new connections with sewists all over the world. I want to say a big thank you to Zoe and to everyone who posted their garments so that I could be inspired by their makes and who had a look at what I made. A special thank you to everyone who left me a comment, these are so appreciated.

Happy sewing....
Rosemary

Saturday, 3 June 2017

Me Made May Week 5

Me Made May is over, but what a good experience it has been. Here are the last few of my makes from this week:

Monday, 29th May
I really don't think this is my best photo and I was tempted to take another one in an edited outfit but in the end I thought "No, this is my Me Made wardrobe in action in everyday life", so I have put this image out there - The real me!

RTW skinny jeans
waterproof coat
walking boots given to me by my sister because they were a bit tight for her - hand me ups!
My new bag here


Tuesday, 30th May
Wrap top, Simplicity 1916


Wednesday 31st May
Me Made May has come back full circle to the pink flowery dress worn this time without the opaque black tights.


So there we are. A great big thank you to Zoe for thinking up this idea and sharing it. Have a look at my Me Made Roundup for an overview of the month.